
Vegetables
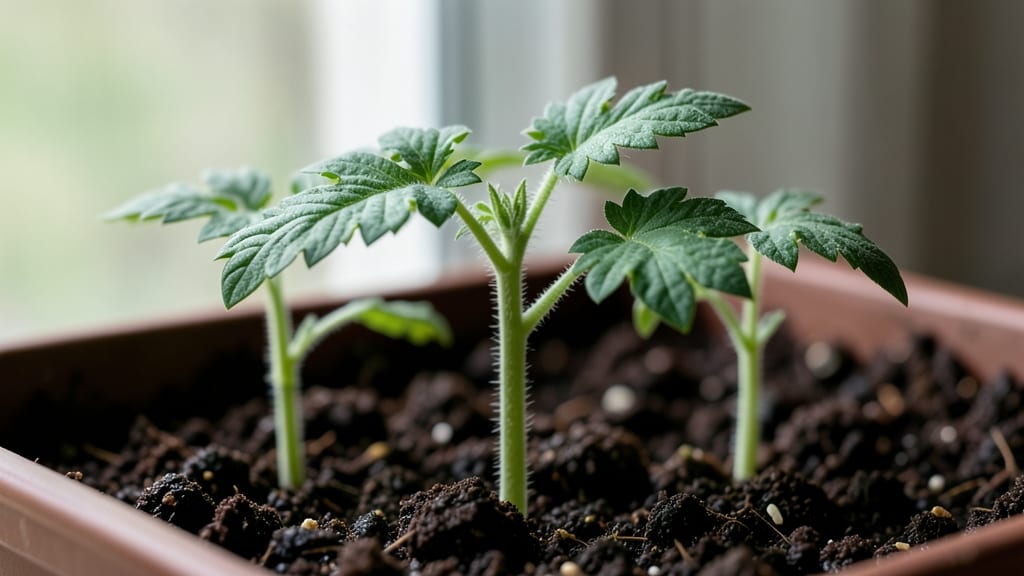
Seeing the pictures of tomato seedlings push through the soil is pure magic. 🌱 I still remember the thrill of spotting my very first green shoot—tiny but full of promise for the juicy harvest ahead.
These pictures will show you exactly what healthy seedlings look like at every stage, from that first wobbly sprout to sturdy transplants ready for the garden.
What makes a seedling strong? Look for vibrant green cotyledons (those first two leaves) and firm stems—no yellowing or stretching. True leaves will emerge next, and by 6-8 weeks, your seedlings should be 12-18 inches tall with multiple leaf sets.
Weak, leggy seedlings need help; we'll show you how to fix them before they're ready to plant.
Each stage reveals what your seedlings truly need. The pictures highlight key features like root development, leaf shape, and stem thickness—all clues to whether your seedlings are thriving or struggling. You'll learn to spot problems early, like damping-off or nutrient deficiencies, so you can adjust care before it's too late.
This isn't just about recognizing growth stages—it's about building confidence. By the time you reach the transplant-ready photos, you'll know exactly what to look for when selecting the strongest seedlings for your garden. Let's grow those tomatoes right!
📚 In This Guide
- What you need
- Instructions
- Tips and common mistakes
- Wrapping up and next steps
What you need
- ● Tomato seeds: 10–20 seeds (depending on desired plants; heirloom or hybrid varieties work best).
- ● Seed-starting mix: 1–2 bags (sterilized, seedling-specific blend; avoid garden soil—it’s too dense!).
- ● Containers: 6–12 small pots (4–6 inches deep) or
- ● A seed tray with individual cells (2–3 inches deep).
- ● Grow lights or sunny windowsill: 1–2 grow lights (12–16 hours/day) or a south-facing window (6+ hours of sunlight).
- ● Spray bottle: 1 (for gentle watering).
- ● Plant labels: 10–20 (to track varieties and dates!).
- ● Fertilizer: Balanced liquid fertilizer (5-5-5 or 10-10-10; dilute to half-strength).
- ○ Optional: Heating mat ($$) for faster germination (70–80°F).
- ● Humidity dome ($) to retain moisture.
- ● Transplanting trays ($) for hardening off seedlings.
- ● Camera or smartphone ($$) to snap those cute growth stage pics!
- ● Prerequisites: Patience (seedlings take 6–8 weeks to transplant!).
- ● Space (seedlings need room to grow—thin or upgrade containers as they outgrow their homes).
How to identify and track tomato seedling growth stages
Here's how I track each stage visually—no guesswork, just clear checkpoints.
🌱 Step 1: Recognize the Germination Stage
The first true milestone is when those tiny white roots break through the soil. You'll see a single, delicate sprout emerge from the seed packet's depth, usually within 5-10 days at 75-85°F. The seedling's first leaves—called cotyledons—look like tiny, rounded shields. They're not true leaves but the plant's first food factories, storing energy from the seed.
Don't be fooled by mold or fuzzy white growth on the soil surface—that's damping-off, a fungal infection. Remove infected seedlings immediately and reduce humidity by removing the germination dome. Healthy seedlings at this stage have firm stems and bright green cotyledons that stand upright.
🌿 Step 2: Spot the First True Leaves
About 7-14 days after germination, you'll notice two smaller, serrated leaves emerging from the base of the cotyledons. These are the first true leaves, and they mark the seedling's transition to photosynthesis. The plant now relies on light for energy, so move it to a bright, indirect light source immediately if it's not already there.
At this stage, seedlings should be 1-2 inches tall with stems about the thickness of a toothpick. If they're leggy (long, thin, and pale), they're stretching toward light. Raise your grow light to 2-3 inches above the plants and rotate the tray daily to prevent leaning. You'll see stronger, stockier growth within a week.
☀️ Step 3: Monitor the Seedling Growth Phase
Over the next 3-4 weeks, watch for the development of the second set of true leaves, which appear smaller and more complex than the first. Healthy seedlings will now have 3-4 sets of leaves and be 4-6 inches tall. The stems should be thick and sturdy, not hollow or weak.
This is when you'll see the first signs of the plant's future form. Look for the main stem (the central leader) and the first leaf axils, where future branches will grow. If you're growing indeterminate varieties, you'll notice small buds forming at these axils. For determinate types, the plant will start to bush out more symmetrically.
⏰ Step 4: Prepare for Transplanting
Seedlings are ready for transplanting when they have 5-7 sets of true leaves and are 6-12 inches tall. The roots should be filling the container, and you might see them growing through drainage holes. Before transplanting, harden off seedlings by gradually exposing them to outdoor conditions over 7-10 days.
During hardening off, watch for leaf color changes—healthy leaves stay deep green, while stressed leaves turn yellow or purple. If you see wilting or leaf drop, move them back to a shaded, sheltered spot and extend the acclimation period by a few days. Once seedlings tolerate a full day outside without stress, they're ready for their permanent home in the garden.
🌱 Step 5: Post-Transplant Checkpoints
After transplanting, monitor the seedlings for 3-5 days to ensure they're establishing properly. Look for new leaf growth at the top of the plant, which indicates the roots have taken hold. Avoid overwatering—soil should feel moist but not soggy to the touch.
If you notice yellowing leaves on the lower stems, it's often a sign of transplant shock. This is normal and temporary, but if it spreads upward or the leaves curl, the plant may be struggling with root damage or pests. Keep an eye out for aphids or spider mites, which love tender young plants. A gentle spray of water can dislodge them, or use neem oil for a natural remedy.
Tips & tricks for perfect tomato seedling development
Tracking tomato seedlings through their growth stages requires patience and attention to detail—here's how to maximize success at every checkpoint.
Temperature Matters: Maintain that 75-85°F range consistently during germination. A heat mat set to 80°F works wonders for speeding up the process while preventing uneven sprouting. If your home runs cooler, consider using a seedling heat mat or placing the tray on top of the fridge. The goal is to mimic the warm, stable conditions of a greenhouse.
Lighting Strategy: Once you spot those first true leaves (around 7-14 days), transition immediately to bright, indirect light—natural sunlight or a grow light positioned 2-3 inches above the seedlings. I've seen leggy seedlings transform into sturdy plants within days when I adjust the light height and rotate the tray daily. This prevents that classic "reaching" growth that makes stems weak and prone to snapping.
Pest Prevention: Yellowing leaves or sticky residue on seedlings often signals aphids or spider mites. I keep a neem oil spray (1 tsp neem oil + 1 quart water) ready for emergencies. For early intervention, spray seedlings with water first thing in the morning—this dislodges pests before they become established. The key is consistent monitoring, especially during the 3-4 week growth phase when plants are most vulnerable.
Pro Tips for Pictures Of Tomato Seedlings
- Tracking tomato seedlings through their growth stages requires patience and attention to detail—here's how to maximiz...
- Temperature Matters: Maintain that 75-85°F range consistently during germination. A heat mat set to 80°F works wonder...
- Lighting Strategy: Once you spot those first true leaves (around 7-14 days), transition immediately to bright, indire...
Frequently asked questions
Got questions about nurturing your tomato seedlings? You’re not alone! Here are answers to the most common queries—from sprout to transplant—so you can grow confidently.
How do I tell if my tomato seedlings are healthy?
Healthy tomato seedlings have vibrant green leaves, sturdy stems (not leggy or weak), and no yellowing or wilting. Check the soil—it should be moist but not soggy. If you spot pests like aphids or fungus (e.g., black spots), act fast with neem oil or fungicide. Pro tip: Gently tug a seedling—if it resists, roots are strong!
When is the best time to transplant tomato seedlings outdoors?
Wait until nighttime temps stay above 50°F (10°C) and all frost risk has passed—usually 2–3 weeks after your last frost date. Seedlings should be 4–6 inches tall with 4–6 true leaves. Harden them off first: acclimate to outdoor conditions over 7–10 days by gradually increasing sunlight exposure. Timing matters: Transplant too early, and cold stress weakens plants.
What if my tomato seedlings look leggy or weak?
Leggy seedlings (tall, thin stems with sparse leaves) usually mean too little light. Move them to a sunny windowsill or under grow lights (12–16 hours/day). Avoid overcrowding—seedlings need space to breathe (aim for 2–3 inches apart). If stems are already floppy, bury them deeper when transplanting (up to the first leaves) to encourage root growth. Fix it fast: Prune leggy stems to promote bushier growth.
Can I grow tomato seedlings indoors without sunlight?
Yes! Use LED grow lights (12–16 inches above seedlings) for 14–16 hours/day. A south-facing window works for short periods, but seedlings will stretch toward light. Keep temps between 65–75°F (18–24°C) and use a seedling heat mat if needed. Reflective surfaces (like aluminum foil) can bounce extra light onto seedlings. Warning: Avoid heat vents—consistent temps prevent stress.
What should I do if my tomato seedlings get mold or fungus?
Common culprits: damping-off (black, mushy stems) or powdery mildew (white dust). Improve airflow by thinning seedlings and avoid overhead watering. Treat with:
- Copper fungicide (preventative)
- Baking soda spray (1 tsp baking soda + 1 quart water + drop of soap)
- Neem oil (natural antifungal)
Remove infected seedlings immediately to stop spread. Prevent it: Sterilize trays with hydrogen peroxide (3%) between uses.
Wrapping up and next steps
Growing tomato seedlings from tiny sprouts to sturdy transplants is a rewarding journey filled with green thumbs and big dreams! 🌱 Whether you’re capturing growth stages with pictures of tomato seedlings or simply tracking progress, each phase brings you closer to a bountiful harvest.
Now that you’ve learned the ins and outs, it’s time to roll up your sleeves and put that knowledge into action—start planting, nurture those little plants, and soon, you’ll be savoring homegrown tomatoes fit for a picnic!
💡 Next step: Pick your favorite tomato variety, grab those seedlings, and give them the love they deserve! Happy gardening! 🌿